


Getting Started as an Evaluator
Welcome to AcceleratorApp. Before you start evaluating applications, take a few minutes to set up your profile and preferences. A complete profile helps program administrators understand your background, and a configured calendar and availability ensure bookings happen smoothly without conflicts.
Some aspects of the evaluation process are controlled by your program administrator. Before your first evaluation session, confirm the following with your admin: whether evaluations are auto-saved or require manual saving, whether you will receive notifications when applications are assigned to you, and whether you will be automatically assigned to all applications or manually assigned to specific ones.
Where to Find Your Profile Settings
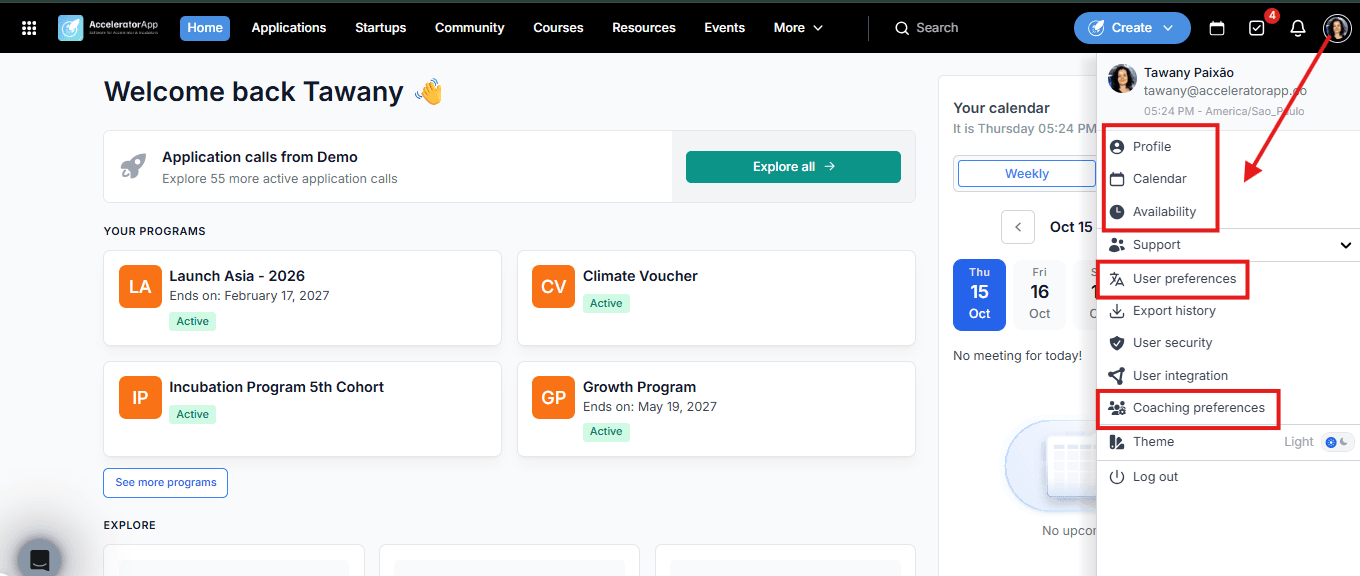
Click on your Account icon in the top-right corner of the platform to access your profile, calendar, availability, and coaching preferences.
Step-by-Step
1. Complete Your Profile
Navigate to your Profile page and click the Edit button next to your name.
From here you can:
- Add a Headline — a short description of your role or area of expertise.
- Link social accounts — connect your LinkedIn or other relevant profiles.
- Add Skills — under the Ask Me About section, click Add Skills to add searchable expertise tags.
- Add a Bio — complete your About section with a brief description of your background.
- Add Professional Experience — click Add Experience to list your relevant work history.
Click Save when done.
2. Link Your Calendar
Navigate to your Account icon and select Calendar. Click Link your Calendar to integrate with your Google Calendar or Microsoft Calendar.
Connecting your calendar ensures that any existing events in your personal calendar automatically block the corresponding availability slots in AcceleratorApp — preventing double-bookings. Your personal calendar events are never visible to other users.
Connecting your Google Calendar also activates Google Meet, and connecting your Microsoft Calendar activates Microsoft Teams — no additional setup needed for video conferencing.

3. Set Your Availability
Navigate to your Account icon and select Availability. From here, set the recurring time slots during which you can be booked for evaluation meetings.
- Use the Settings mode to define your standard weekly availability.
- Use the Weekly view to override availability for specific dates (e.g. holidays or travel days).
Your availability will be combined with the funnel settings configured by your program administrator to determine when applicants can book meetings with you.
4. Configure Your Coaching Preferences
Navigate to your Account icon and select Coaching Preferences. These settings define how your evaluation meetings are structured and where they take place — they will be combined with what your program administrator has configured in the funnel.
Configure the following:
- Do you want to offer coaching meetings from your profile — select Yes or No depending on whether you want to be bookable directly from your profile.
- Session duration — choose your preferred meeting length (e.g. 30 minutes).
- Default meeting location — choose between a video conferencing integration or a fixed link. If you select Yes for video conference provider, your connected calendar integration (Google Meet or Microsoft Teams) will be used. Alternatively, paste a fixed meeting link that will be used for all sessions.
- Increment for meeting start times — choose between Optimize for max meetings or set a manual increment in minutes.
- Minimum notice period — set the minimum number of hours in advance a session must be booked.
Click Save when done.
5. Understand How the Evaluation Process Works
Before you start evaluating, it is worth knowing that several aspects of the process are defined by your program administrator:
- Auto-save vs manual save — the admin defines whether your evaluation responses are saved automatically as you fill them in, or whether you need to click Save manually before they are recorded. If you are unsure, confirm this before your first evaluation to avoid losing work.
- Notifications — the admin decides whether evaluators receive in-platform notifications when a new application is assigned to them. If notifications are enabled and you have your daily digest email active, you will also receive these notifications by email.
- Assignment method — the admin determines whether you are automatically assigned to all applications in a funnel, or manually assigned to specific ones only. If you are expecting to see an application and it is not visible, contact your program administrator.
Best Practices
- Complete your profile before your first evaluation. A clear headline and skills list help program administrators match you to the right applications.
- Link your calendar as early as possible. This prevents accidental double-bookings from day one and activates your video conferencing tool automatically.
- Set recurring availability that reflects your real schedule. It is better to offer fewer slots consistently than to cancel bookings last minute.
- Confirm the evaluation process with your admin before starting. Knowing whether evaluations auto-save, how you will be notified, and how applications are assigned helps you work more confidently from day one.