


How to Create Custom Metrics
Tracking the right metrics is essential for understanding startup progress, measuring program success, and making data-driven decisions. While AcceleratorApp provides predefined core metrics, custom metrics allow you to create tailored KPIs that align with the specific objectives of your incubator or accelerator — ensuring structured and relevant reporting across all participating startups.
If the default core metrics are enabled in your environment, any new startup created will automatically start receiving data collection requests — and this cannot be removed retroactively. If you want to disable default metrics and use only custom ones, we recommend aligning this with your Customer Success Manager during implementation before any startups are created.
Where to Find Metrics
Navigate to Startups in the top menu and select Metrics & Data Collection.
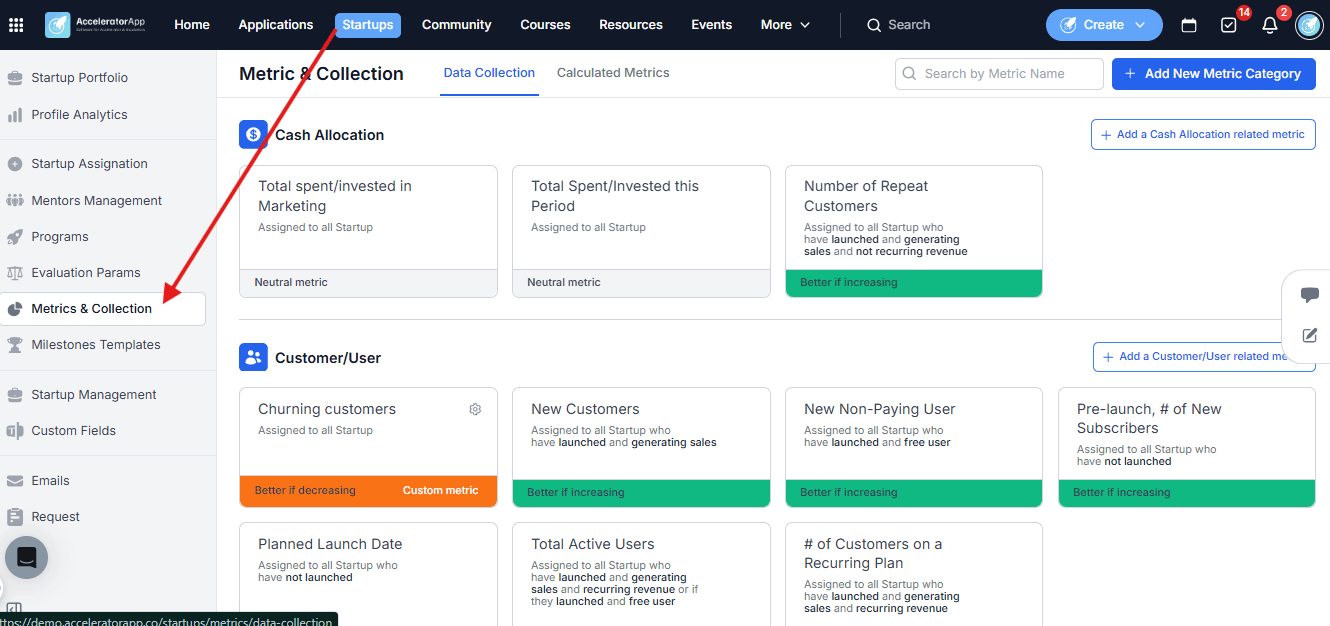
Step-by-Step
1. Choose Your Metric Creation Option
- Click Add New Metric Category to create a new group from scratch.
- Or click Add a Customer/User related metric next to an existing category to add a metric within an existing group.
2. Configure the Metric
Fill in the following fields:
- Name — Enter a clear and descriptive name for the metric.
- Collection Frequency — Choose how often this metric needs to be collected (e.g. monthly, quarterly).
- Category — Select an existing category or create a new one to group your metrics appropriately.
- Unit of Measure — Select the appropriate unit type for your data points. This field cannot be edited after the metric is created.
- First Collection Date — Set the date from which data collection begins. See the note below for how past and future dates behave.
- Collection Status — Toggle the metric to active or inactive to control whether data collection is currently running.
- Allow Negative Values — Enable this toggle if the metric can accept negative values.
- Assign to Startups — Define whether this metric applies globally to all startups, or only to a specific group filtered by program or tags.
- It is better when metric is — Choose between Increasing, Decreasing, or Neutral.
- Description — Add any instructions or context to help startups understand what data to submit and how.
3. Save the Metric
Click Save to finalize the configuration and store the metric in your system.
What Happens After Saving
Once a metric is saved and set to active, AcceleratorApp automatically:
- Sends an email notification to the relevant startup founders.
- Drops a pending request notification in their app portal, included in their end-of-day digest.
- Assigns an automated task to all founders of the selected startups — the task marks itself complete as soon as any single founder updates the metric.
The timing of these actions depends on the First Collection Date you set:
- Date in the past — the system will generate a task for each missed collection period between the first collection date and today, based on the collection frequency. For example, if today is July 1st and you set a monthly metric starting January 1st, tasks will be created for January, February, March, April, May, and June — one per period.
- Date in the future — no tasks or notifications are triggered immediately. Data collection will begin on the specified date, and tasks and notifications will fire from that point forward according to the collection frequency.
Best Practices
- Plan your First Collection Date carefully. A past date generates backfilled tasks for every missed period — useful if you want historical data, but it can create a large number of tasks at once if the date is far in the past.
- Align default metrics with your CSM before going live. If default core metrics are enabled, every new startup will automatically receive data collection requests from creation. Disabling them requires early coordination with your Customer Success Manager — this cannot be undone retroactively.
- Use categories to keep metrics organized. Grouping related metrics under a clear category makes reporting and analysis significantly easier as your data grows.
- Use the description field. Clear instructions reduce the chance of startups submitting incorrect or inconsistent data — especially for metrics that require specific definitions or calculations.
- Analyze and export from the startup file. Visit the Analytics tab in any Startup File to view graphic trends or export the raw data to CSV or Excel.