Introduction to Application Funnel Setup
The Application Funnel is the engine of your recruitment process. It allows you to collect data, conduct interviews, and evaluate candidates in a structured, multi-stage pipeline before they are officially accepted into your ecosystem.
Key Principles:
Program Independence: Funnels are not permanently linked to one program. The same funnel can funnel applicants into various programs once they are accepted.
Versatility: Use funnels for startup cohorts, community membership, or even internal hiring.
Preparation is Key: For a smooth setup, create your Forms, Email Templates, and Taxonomy (Tags) before building the funnel.
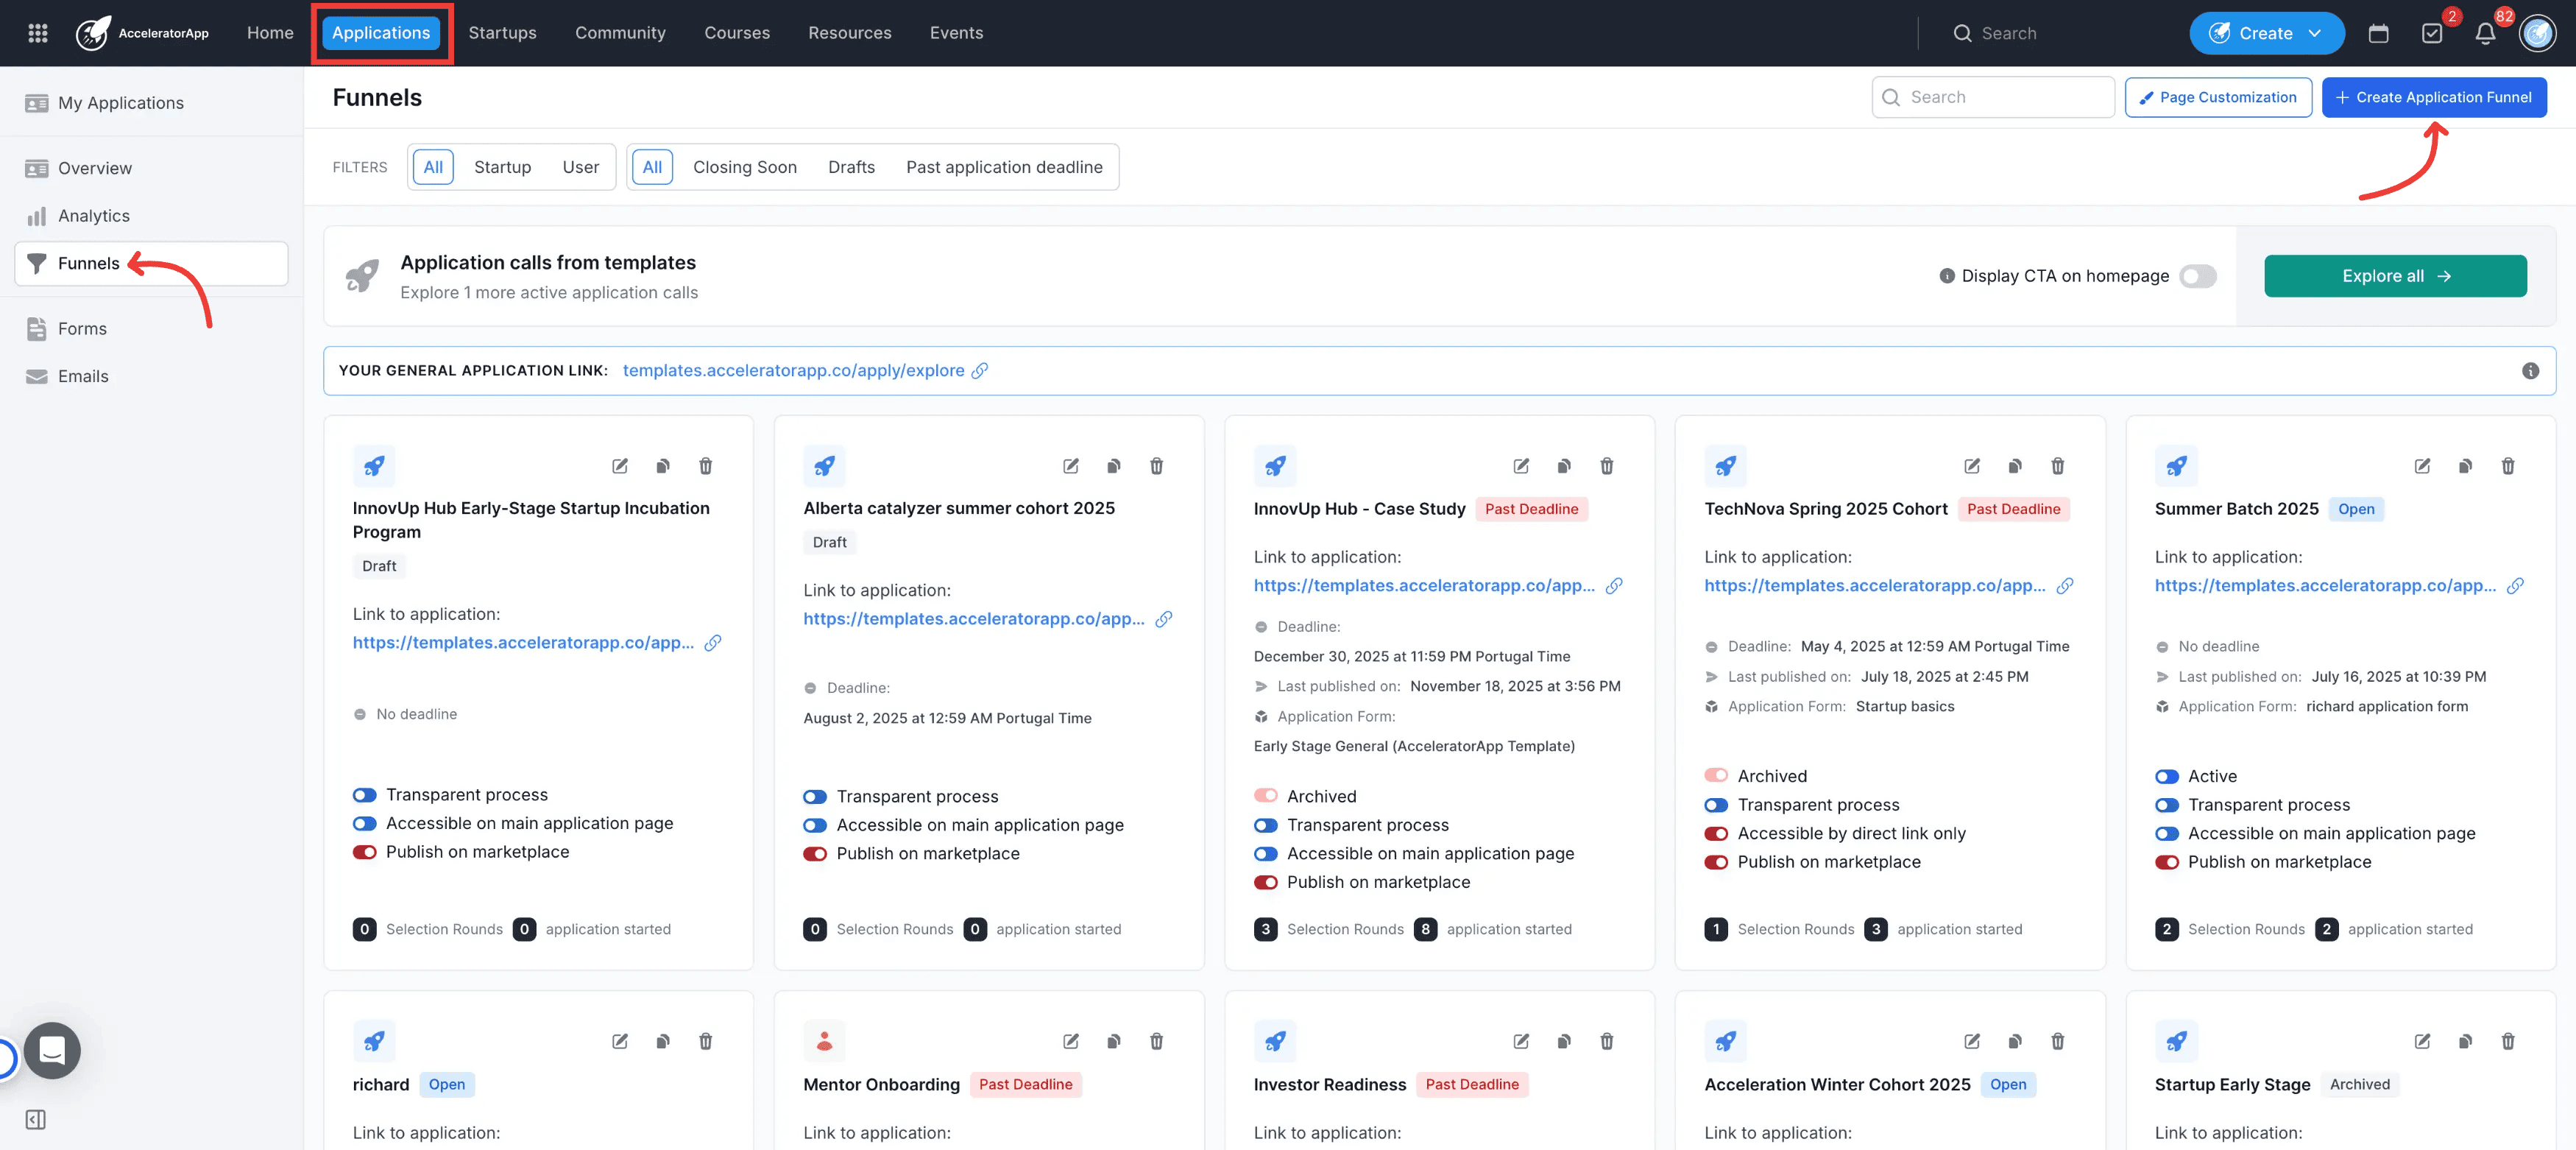
Where to create an Application Funnel
Funnels are managed within the Application Module of the platform.
Navigation: Click on the Application module in the top navigation bar and select the Funnels tab.
Step-by-Step Configuration
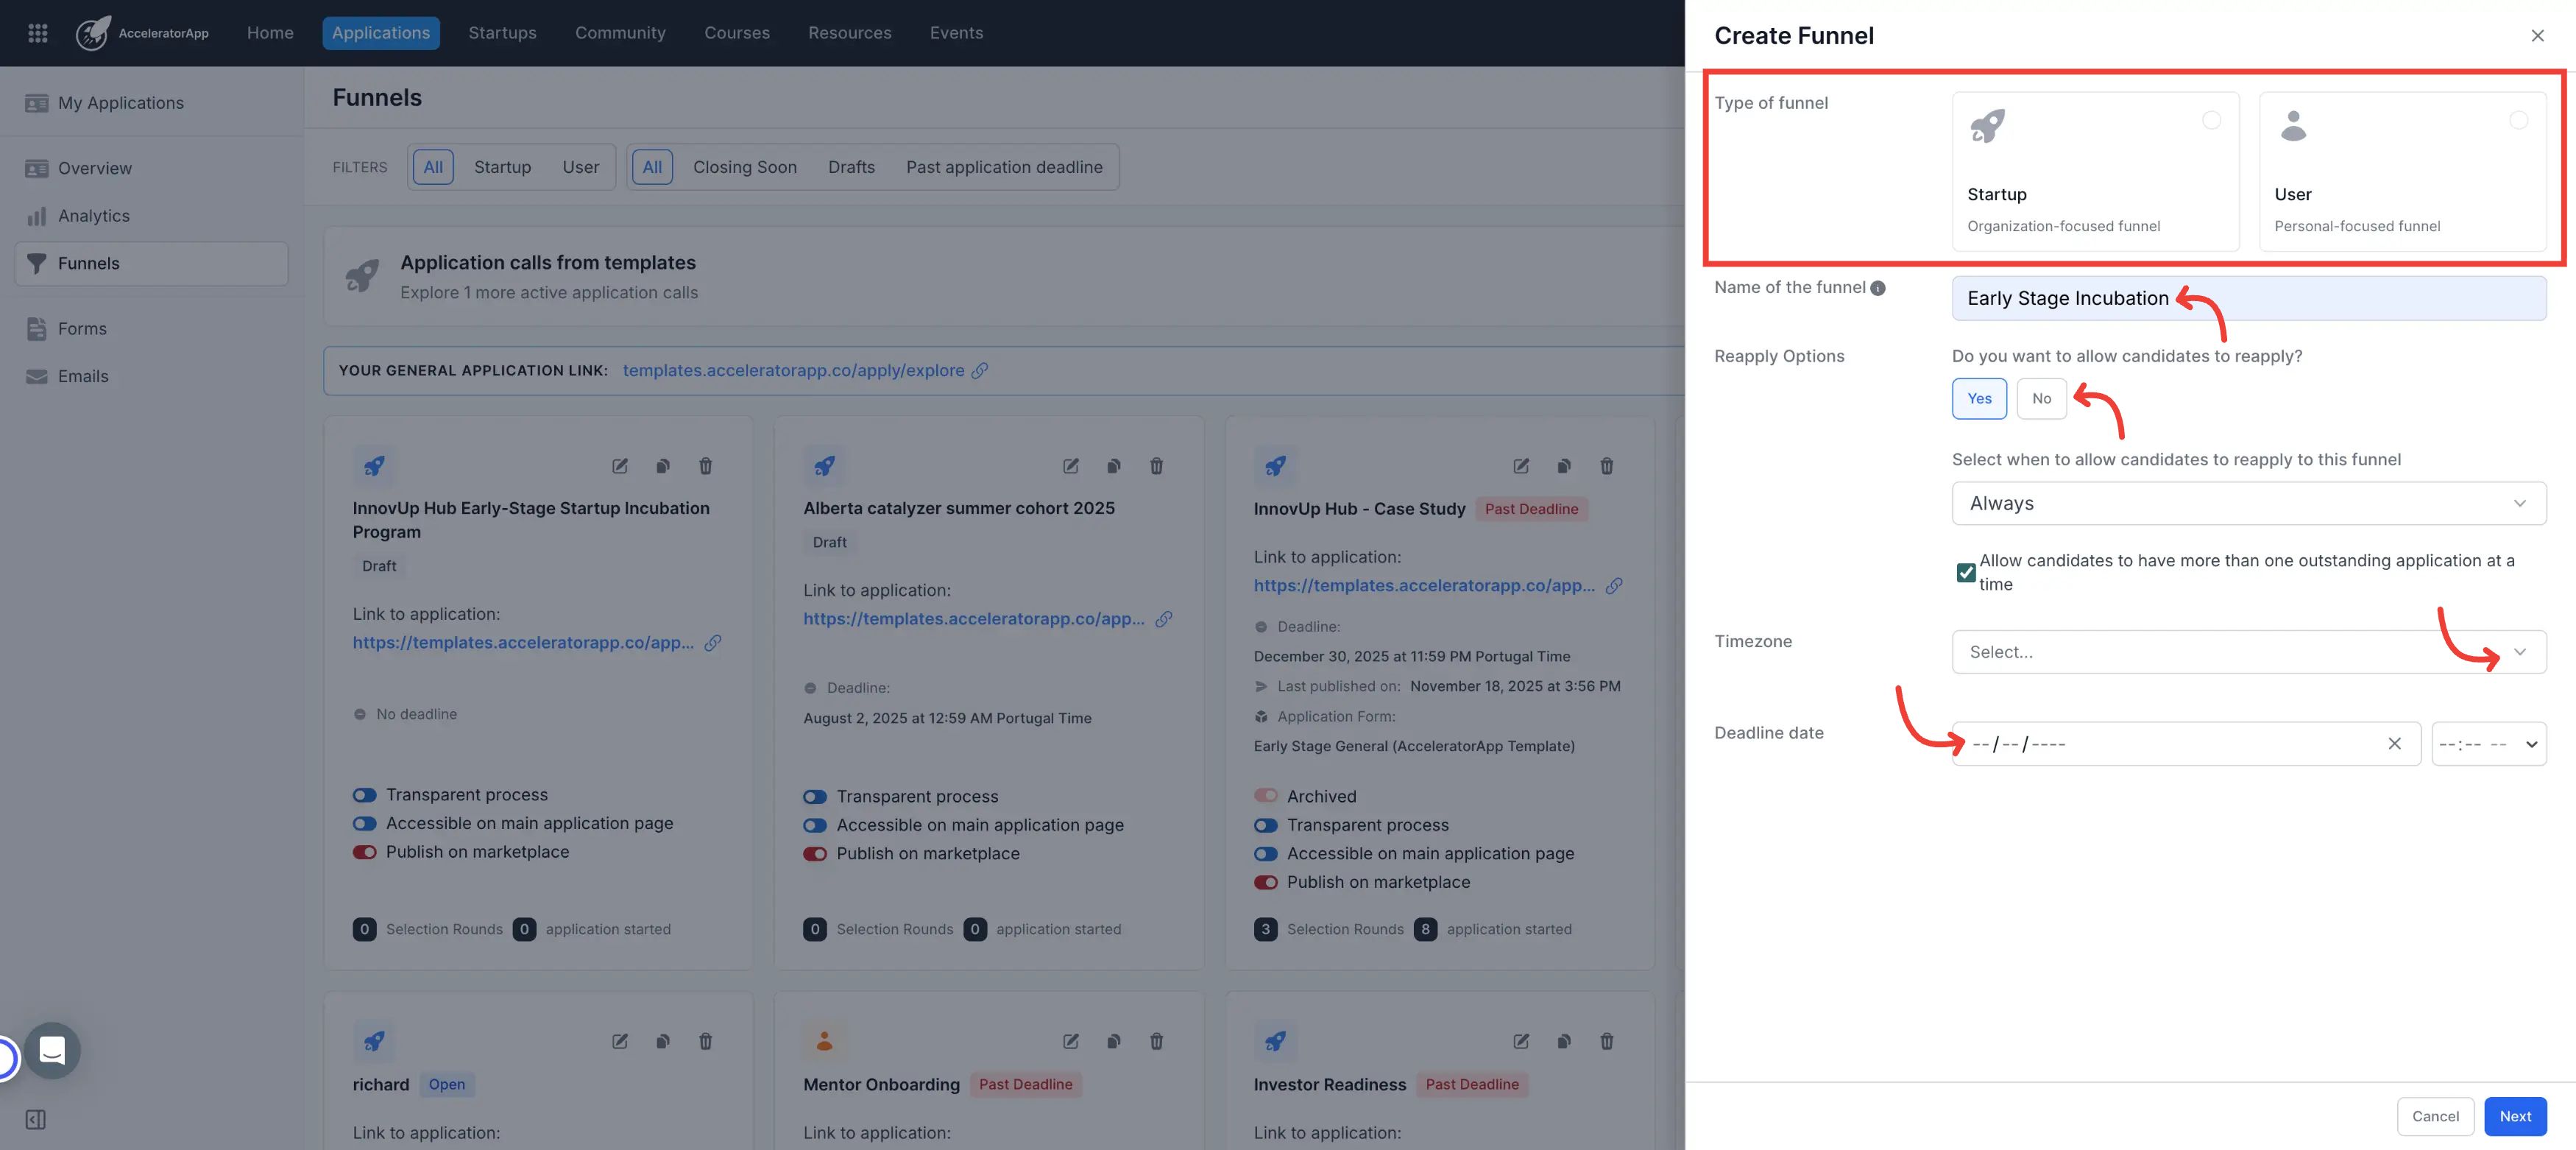
1. Funnel Creation
Click on the blue button Create Application Funnel
Select Funnel Type: Choose between Startups (for organizations/projects) or Users (for individual community members).
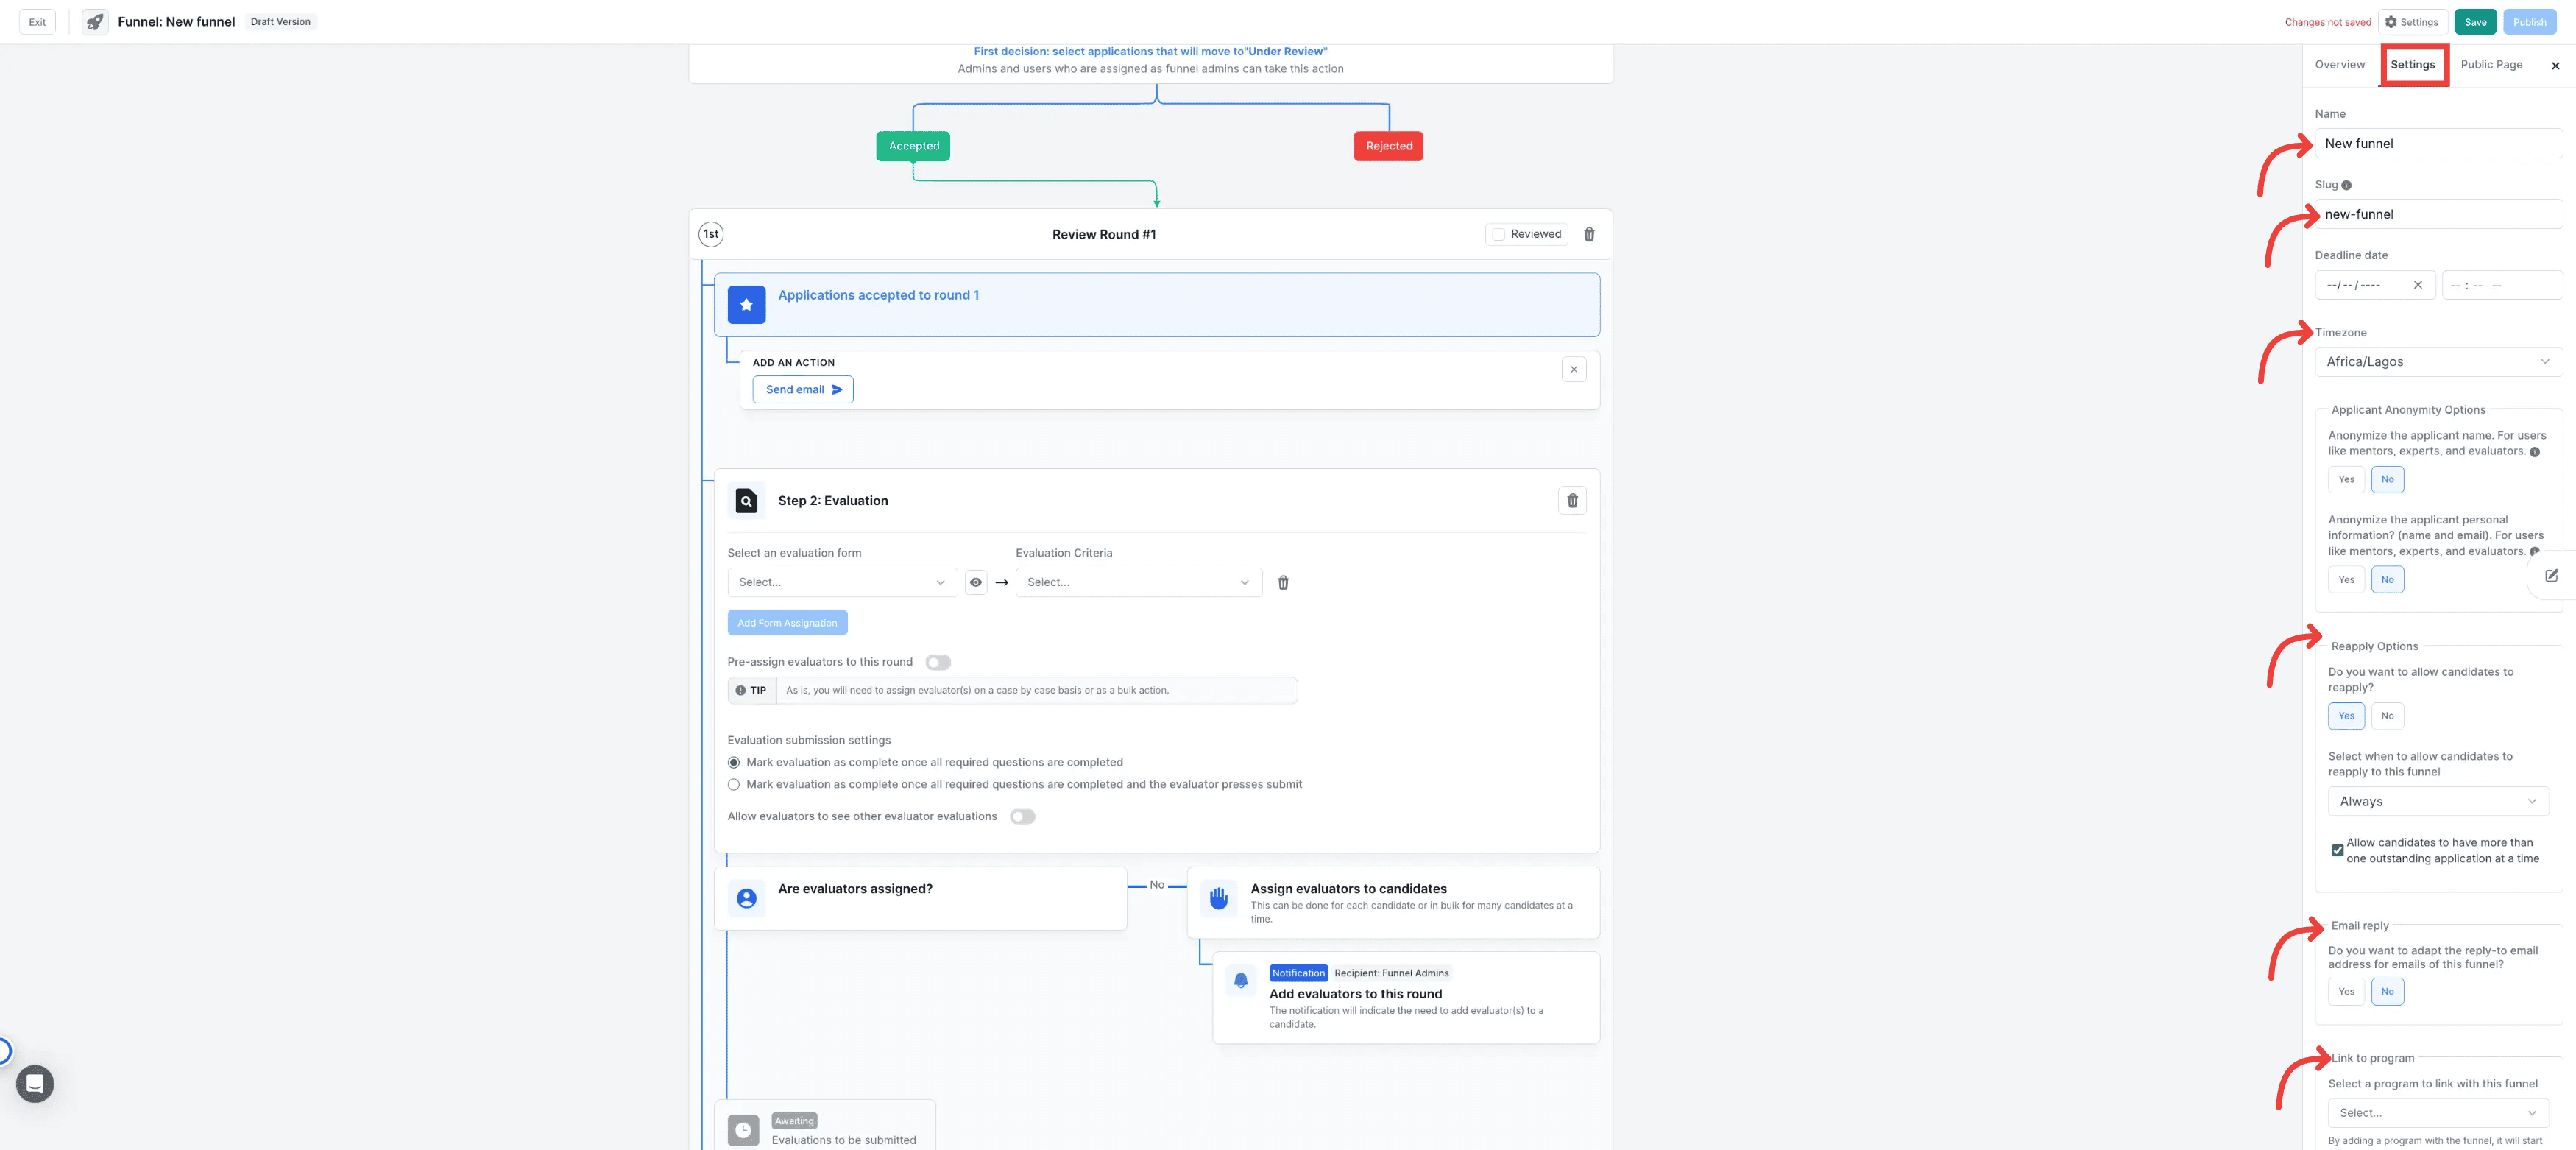
Naming: Enter the funnel name. Applicants will see this during account creation (e.g., "You are applying for [Funnel Name]").
Re-apply Logic: Define if candidates can re-apply (Always, after a set period, or after a specific date) and if they can hold multiple active applications.
Timezone: set the timezone this funnel will happen. Please note it will be used for your deadline
Set Deadline (Optional): Define the date, time, and timezone to automatically close the funnel. Incomplete drafts will be archived once the deadline passes.
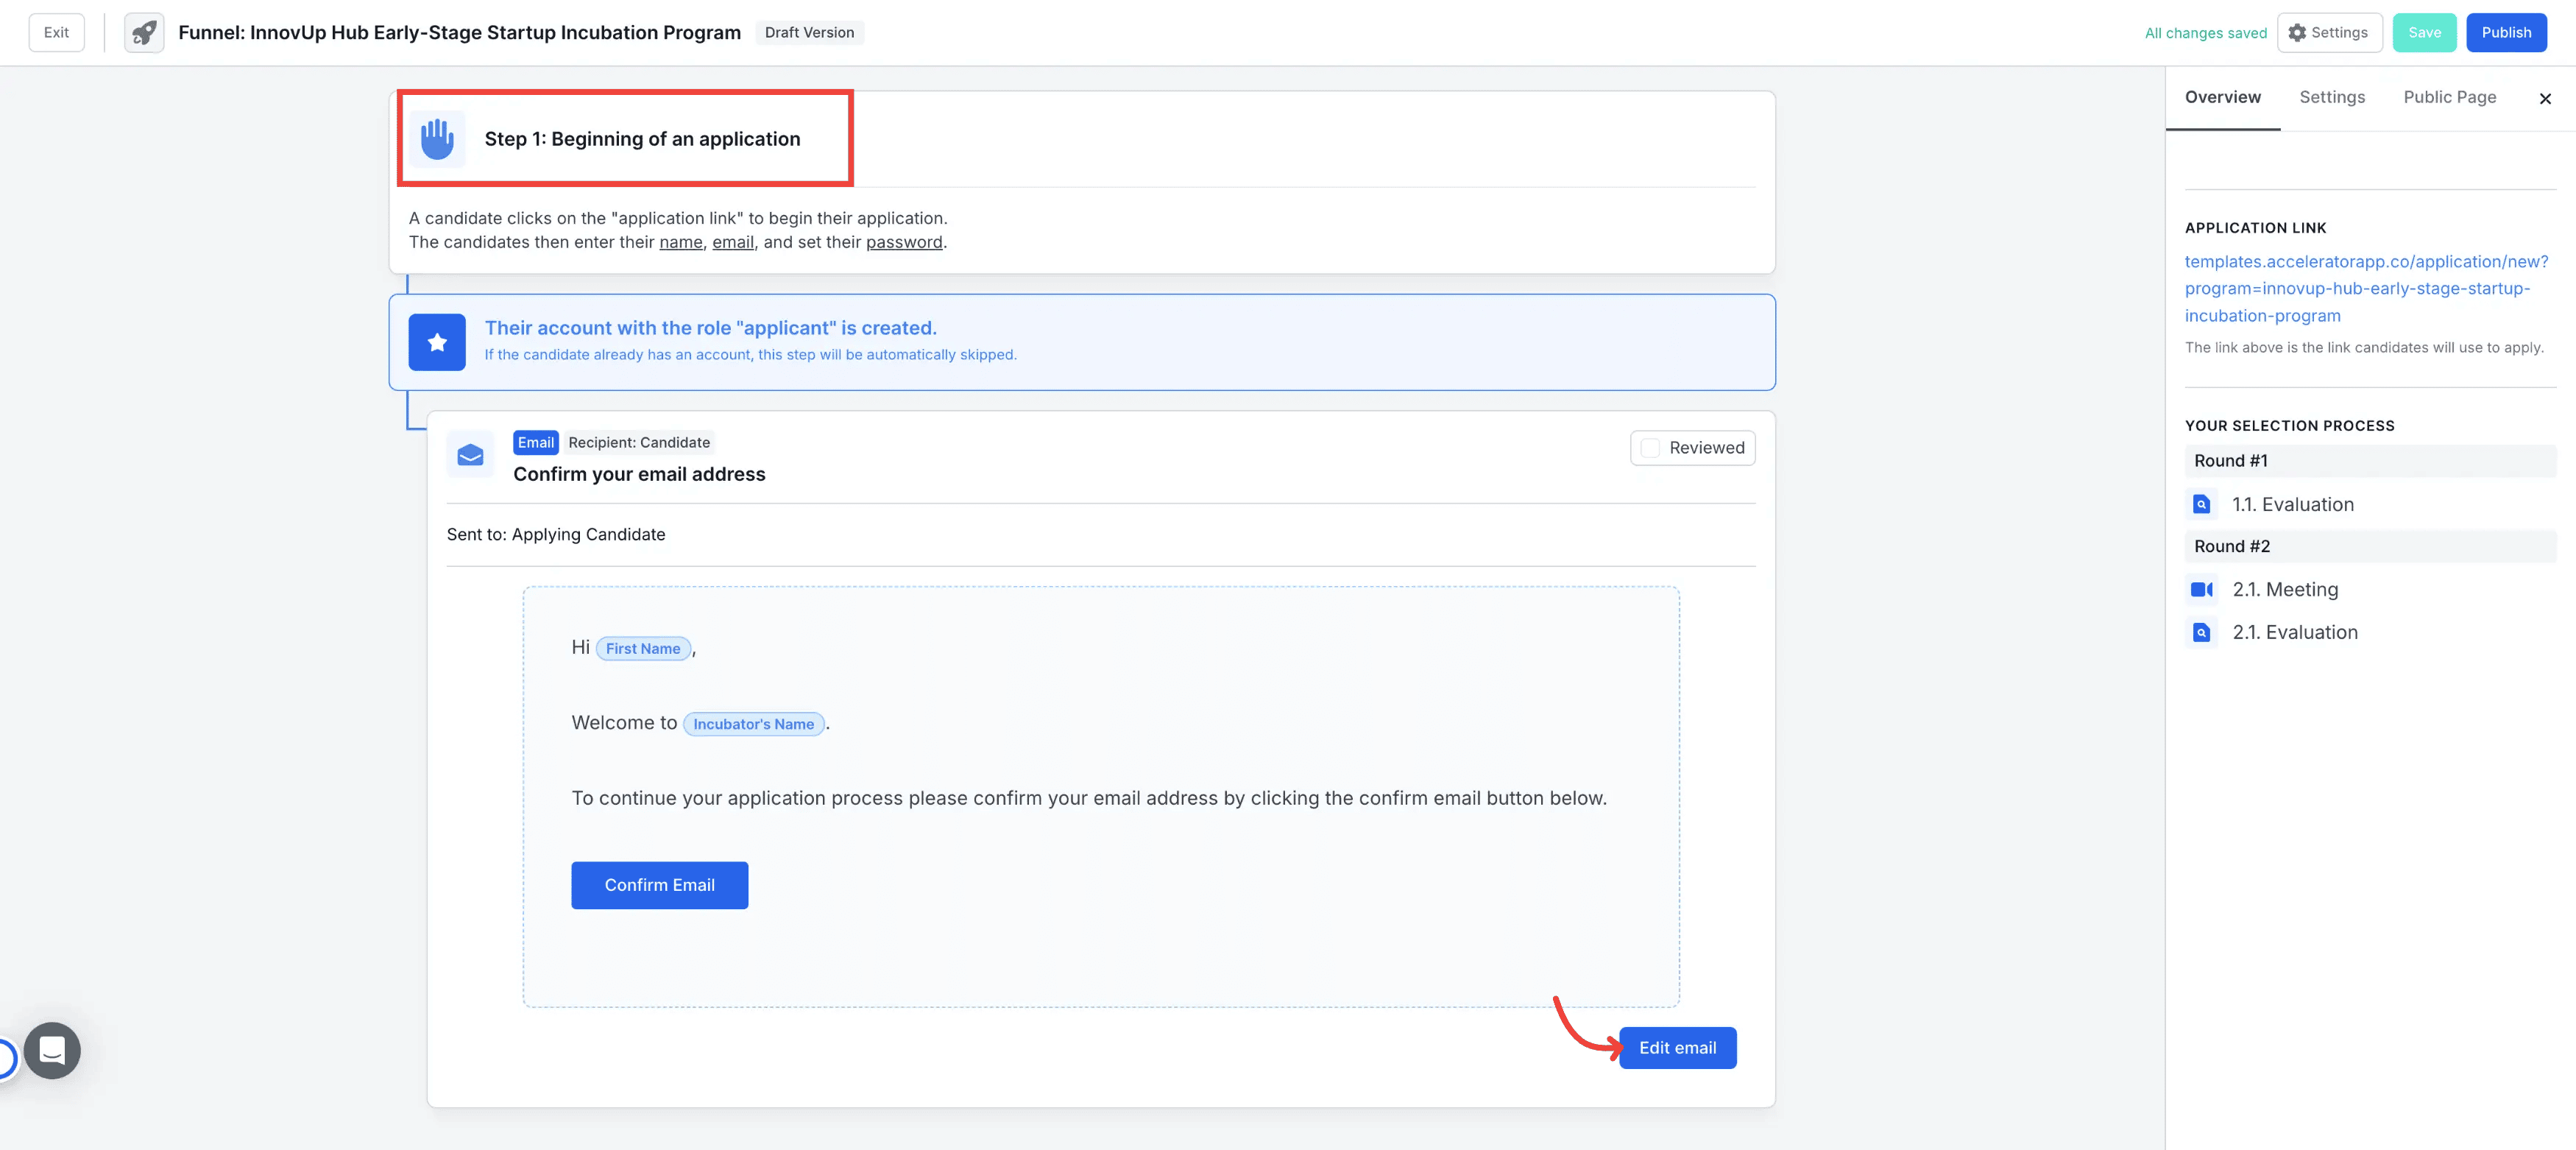
2. Account Creation and Application Submission
- Account Creation: Applicants provide their name and email to receive an activation link. You can customize the Activation Email to ensure it aligns with your brand voice. This email is essential for validating the applicant's identity.
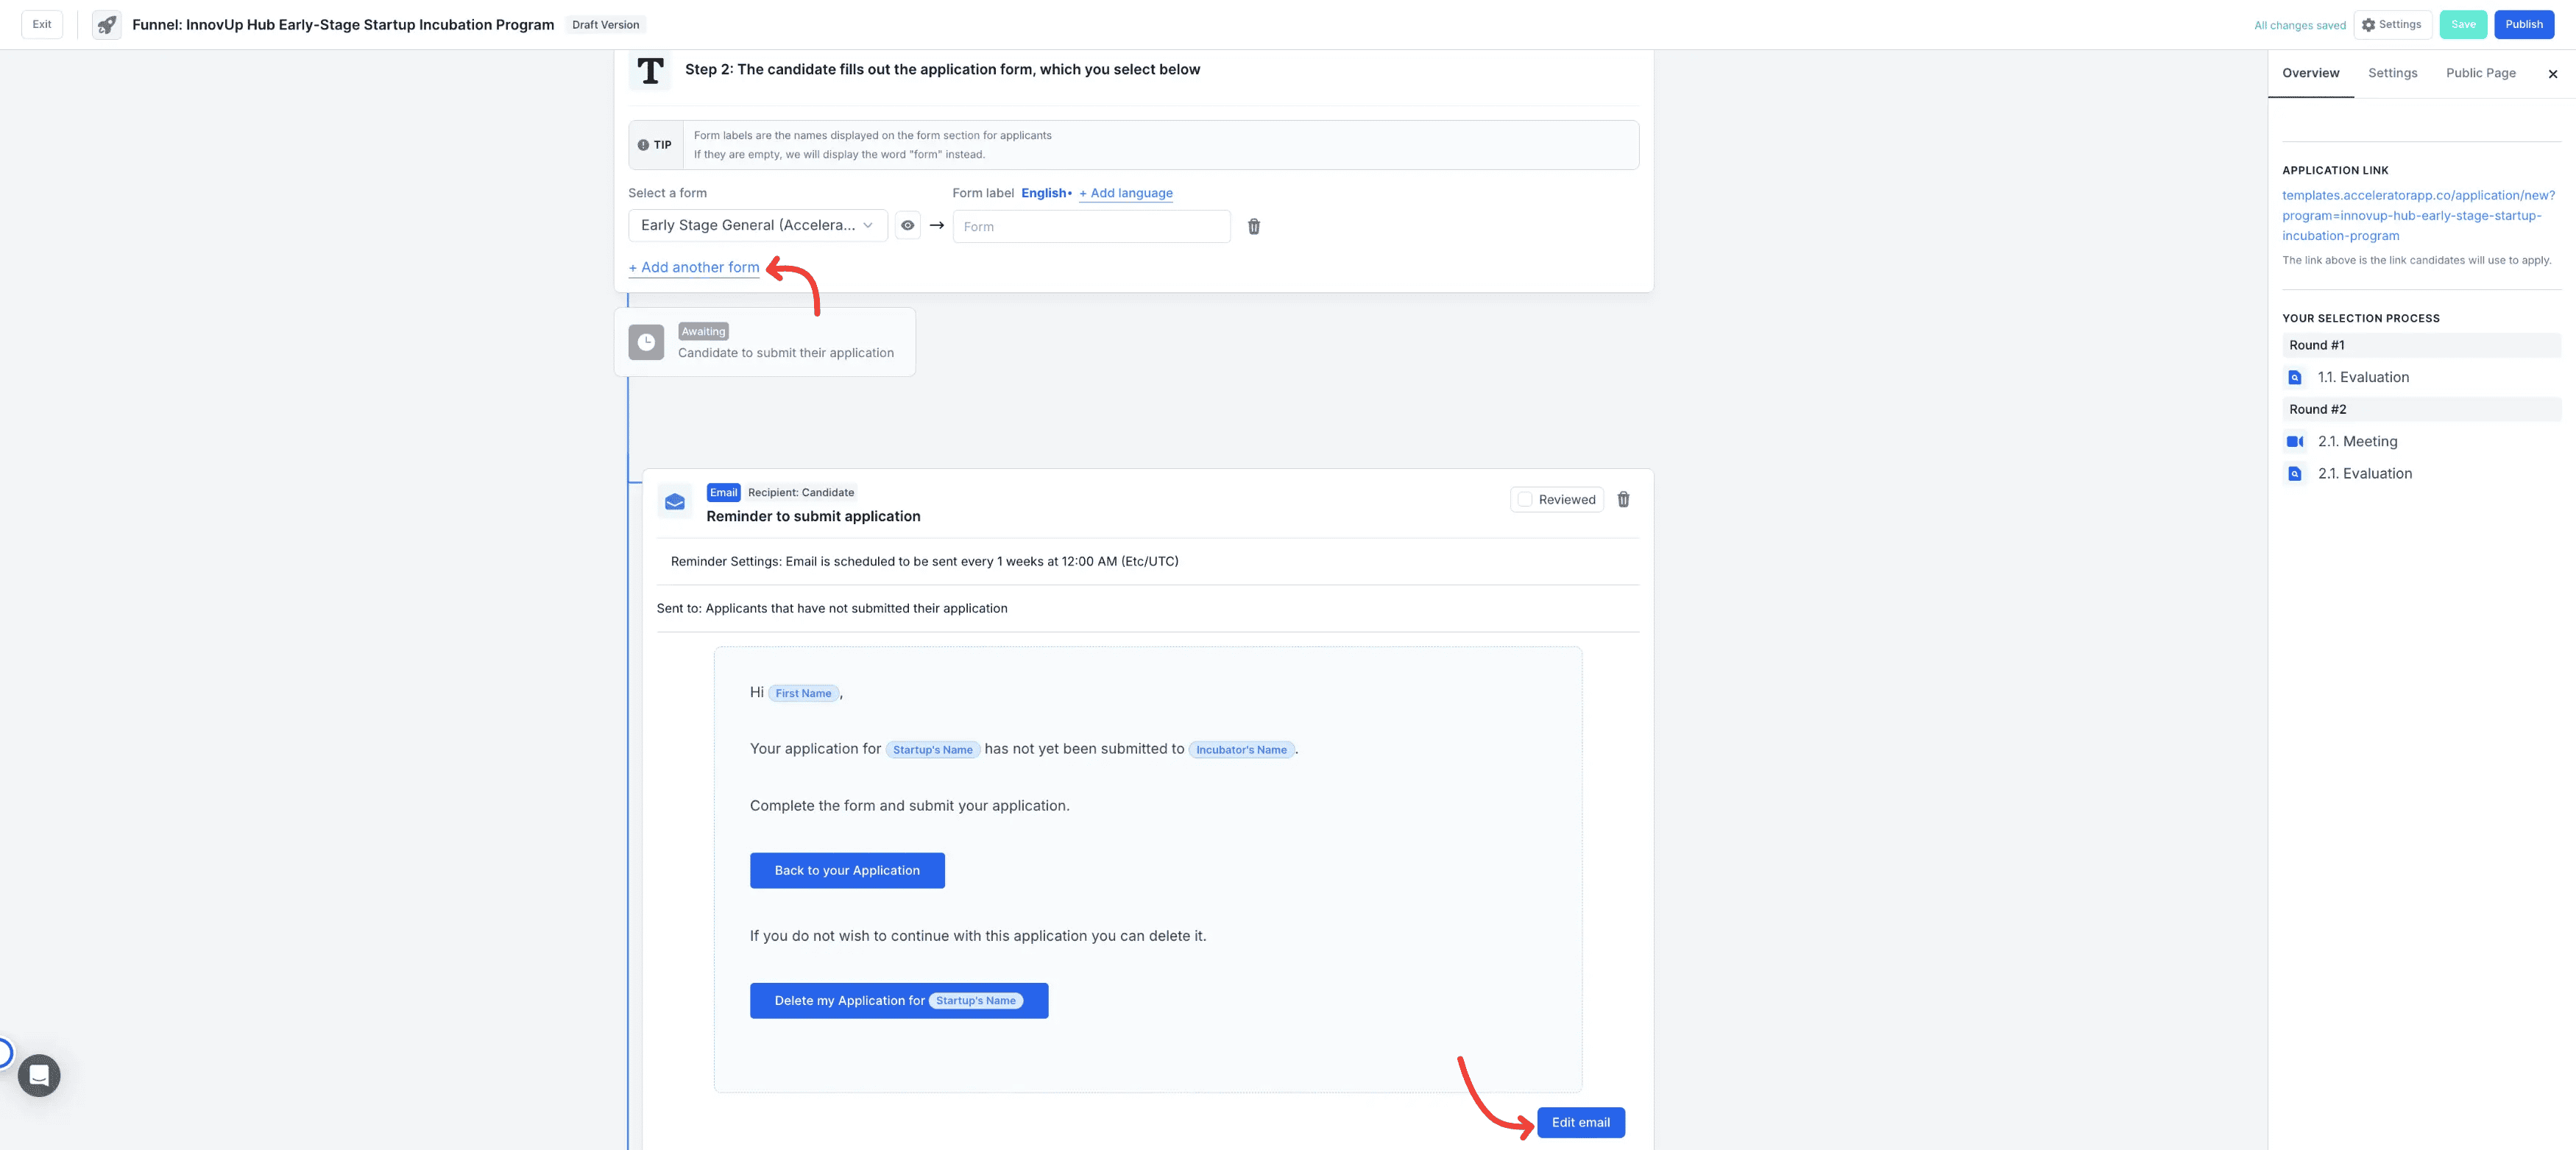
Select Application Form: Link the specific form(s) applicants must fill out.
Automate Reminders: Click on the button "Add Action" to set up automated "nudges" for applicants who have started a draft but haven't submitted.
_Logic: Reminders are sent based on the Application Start Date. For example, if set to "Weekly," each applicant receives it relative to when they started until they submit or the funnel closes.
Note: This feature is available in the Pro Plan or Application Module Tier 3._
- Application Submitted: Edit the Confirmation Email sent automatically once the applicant hits submit.
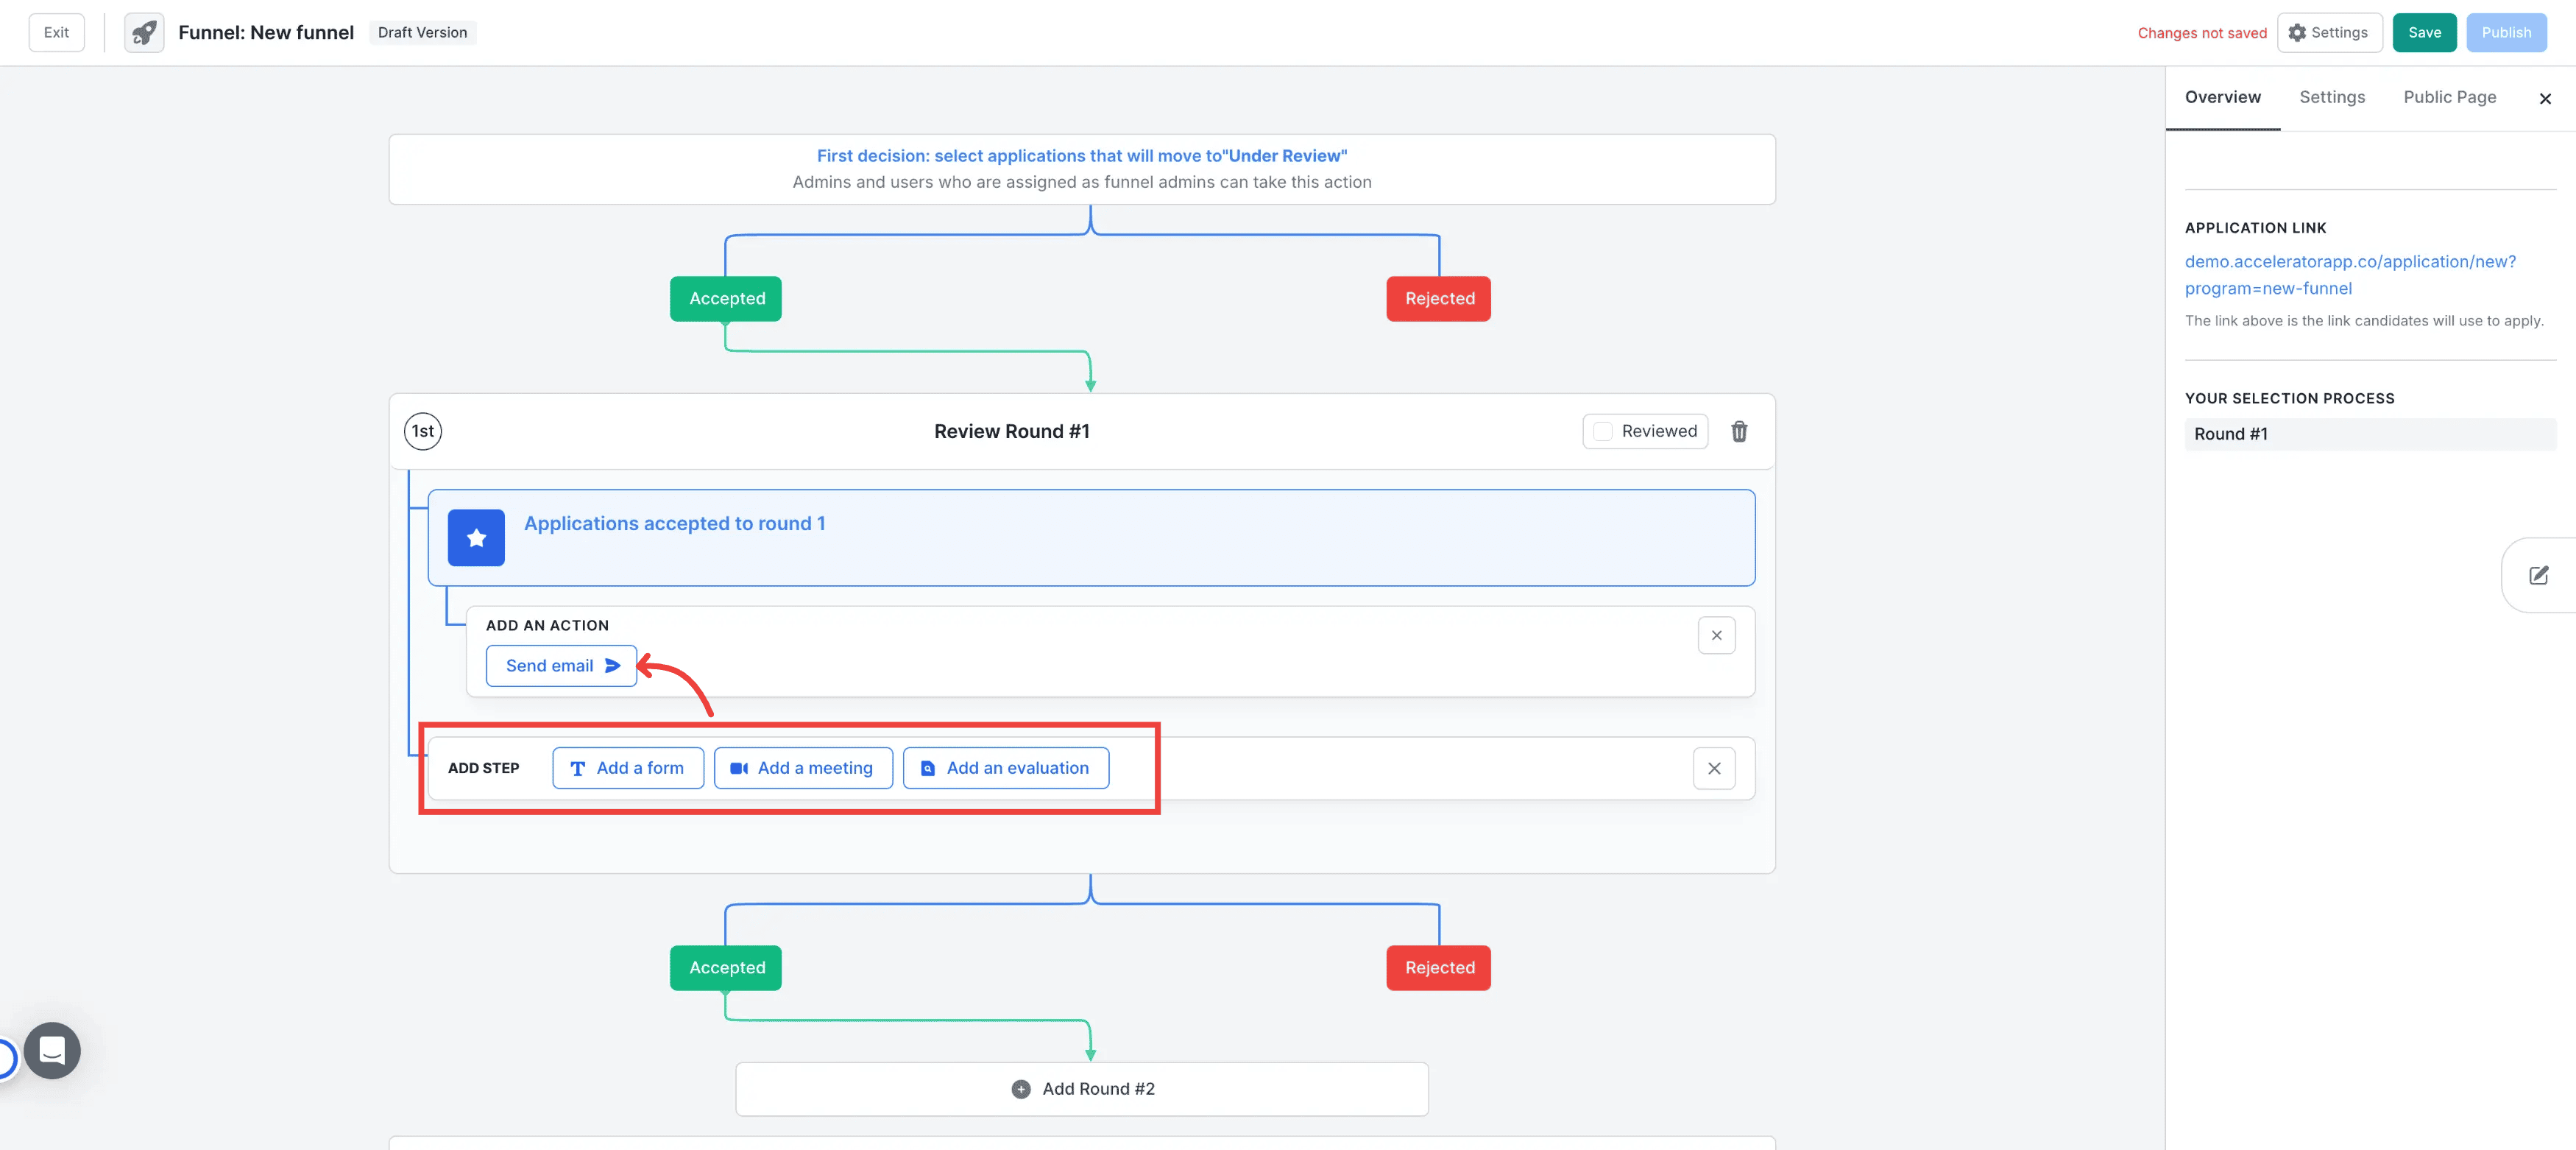
3. Building Selection Rounds
From this stage forward, you begin making decisions. Click “Add Round” to define your evaluation pipeline.
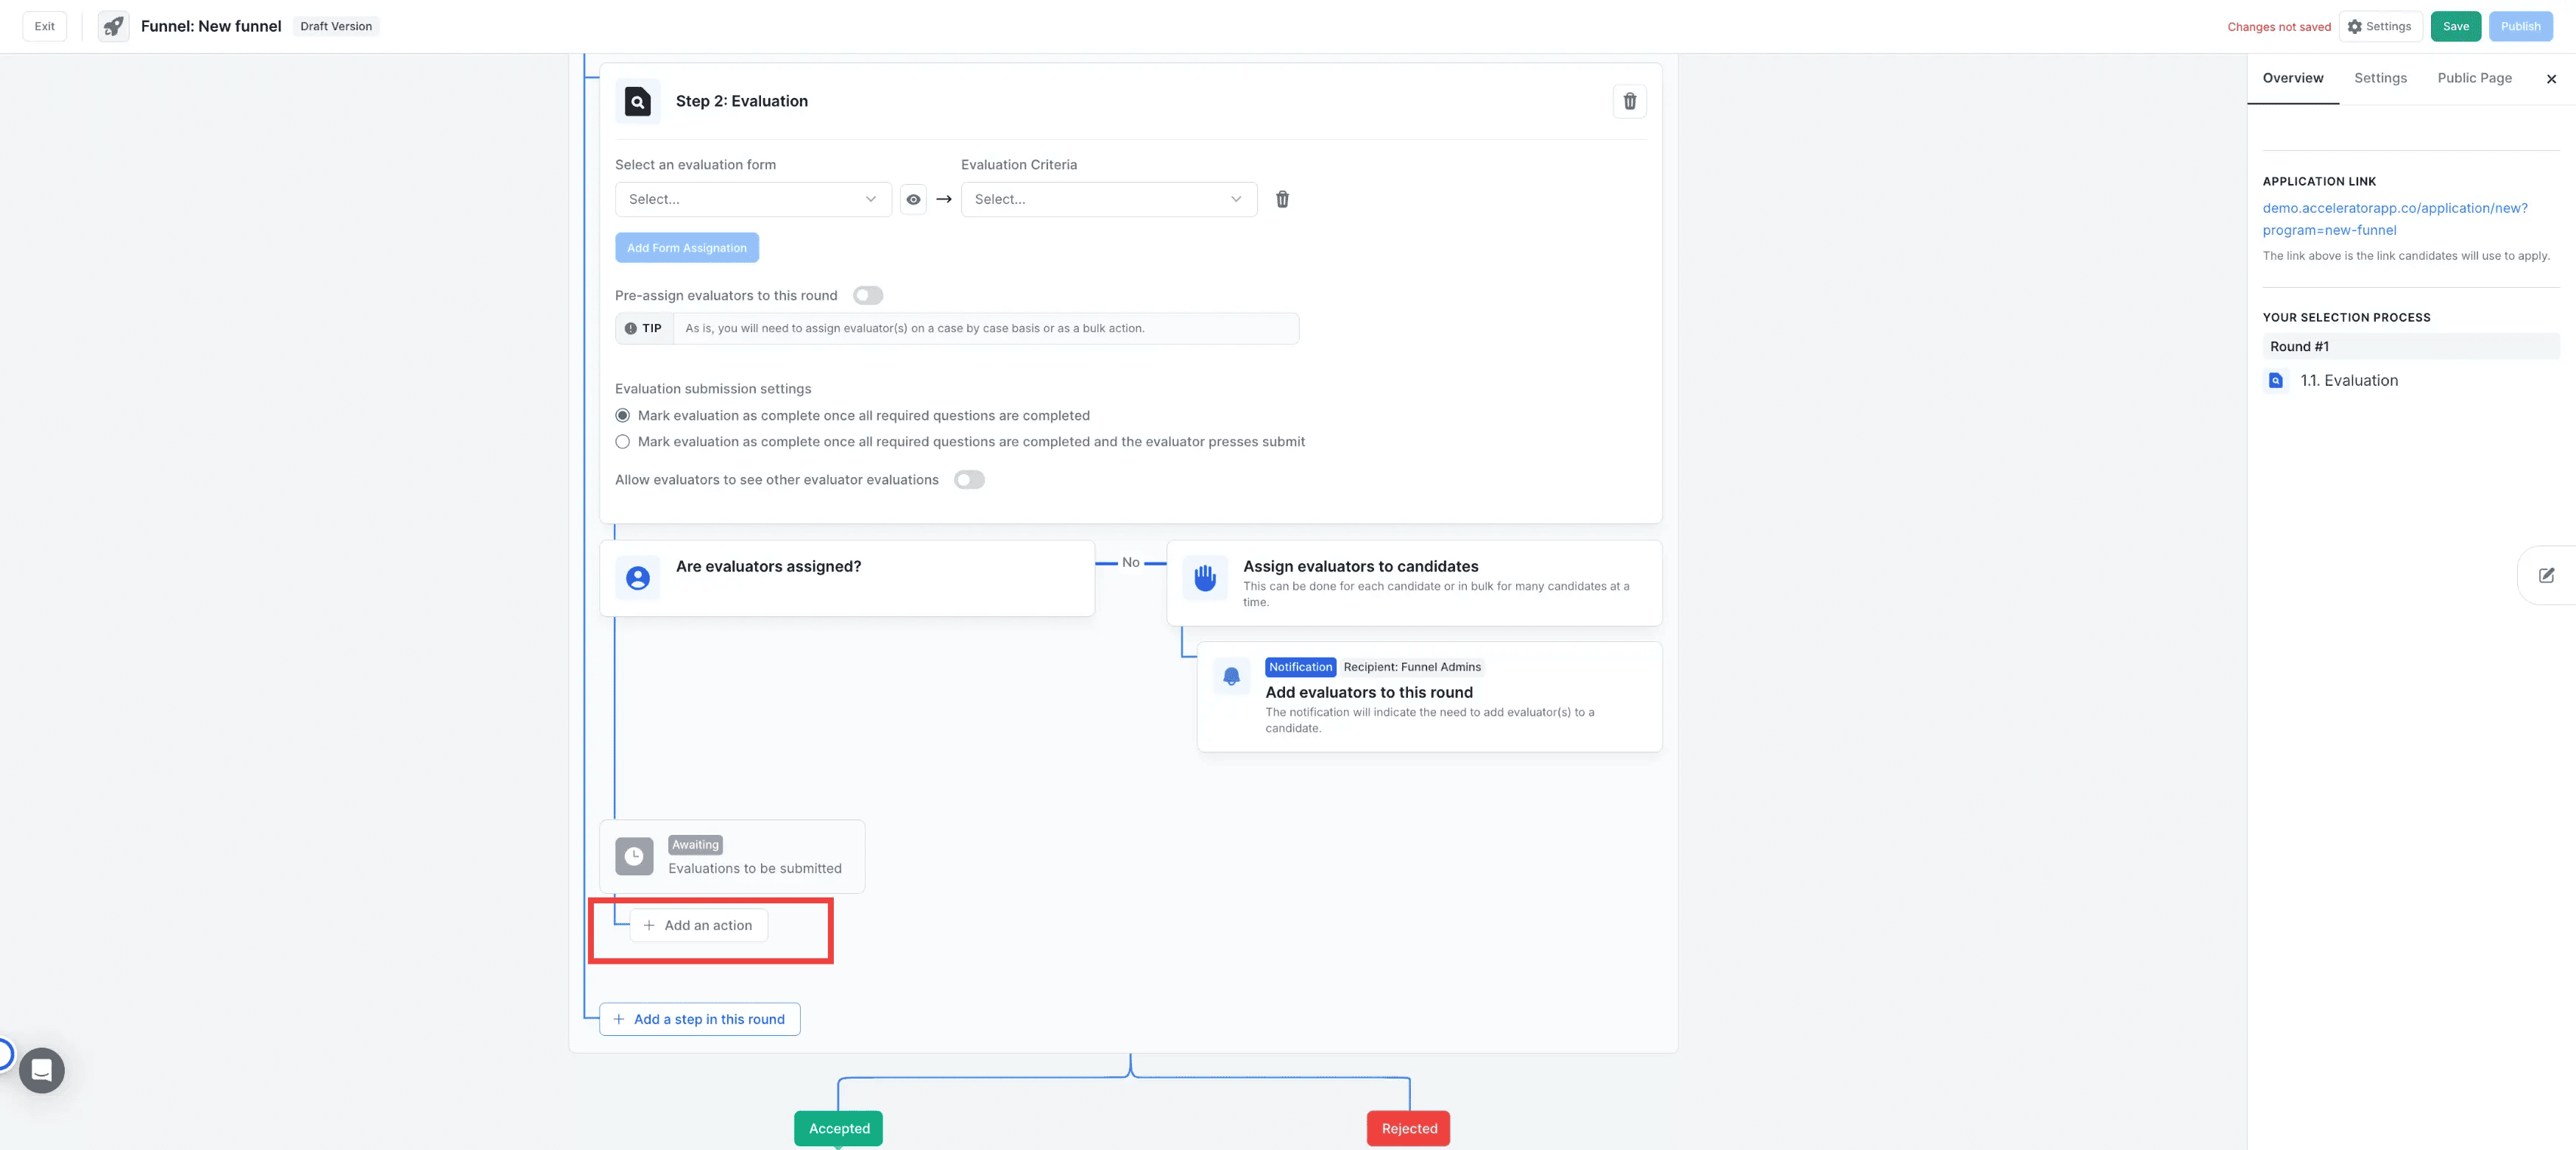
- Add Actions & Steps per Round: Inside each round of your funnel, you have the flexibility to define exactly how the candidate moves forward and how your team reviews them.
Actions: Automated Communication
An Action is an automated instruction email sent to applicants immediately upon being accepted into a specific round.
Steps: there are three type of steps you can add
Steps
There are three types of Steps you can add to a round to gather more data or facilitate a review:
New Form: Request "Phase 2" data from shortlisted candidates. This allows you to keep your initial intake form short and only ask for sensitive or detailed information (like Due Diligence, Financials, or Cap Tables) from those who pass the first cut.
Meetings: Add an interview stage where applicants book time directly on your team’s calendar. This step integrates with your connected calendars to eliminate back-and-forth scheduling emails.
Evaluations: Select the specific Evaluation Forms required for this round.
Note: To create dedicated task for your internal staff or external judges to score and comment on the applicants add an action in the evaluation step
4. Rejection & Acceptance
- Rejection
If a candidate does not meet the criteria, you can reject the appliant(s) at any stage of the funnel.
Email Selection: Rejection emails are managed in the Email Management section of the platform. You do not need to write them within the funnel itself.
Customization: When rejecting a candidate, the system will prompt you to select which specific rejection template to send (e.g., "Standard Rejection" vs. "Feedback-Heavy Rejection"). Click here to know more about Rejection Emails.
- Final Acceptance: Upon accepting in the last round, select the Program(s) and Tags for the new member. The email sent is the one tied to the selected Program Settings. You don't need to set it up form here it has to be done from the program settings
5. Advanced Settings: fine-tune the technical and privacy aspects of your funnel:
General: Edit the funnel name, URL slug, deadline, and timezone.
Applicant Anonymity: Hide full names and contact info from evaluators to ensure unbiased scoring. (Available in Pro Bundle / App Process Tier 3).
Re-apply Options: Decide if and when a rejected candidate can try again.
Inbox Routing: Select which admin inbox should receive direct replies from automated applicant emails.
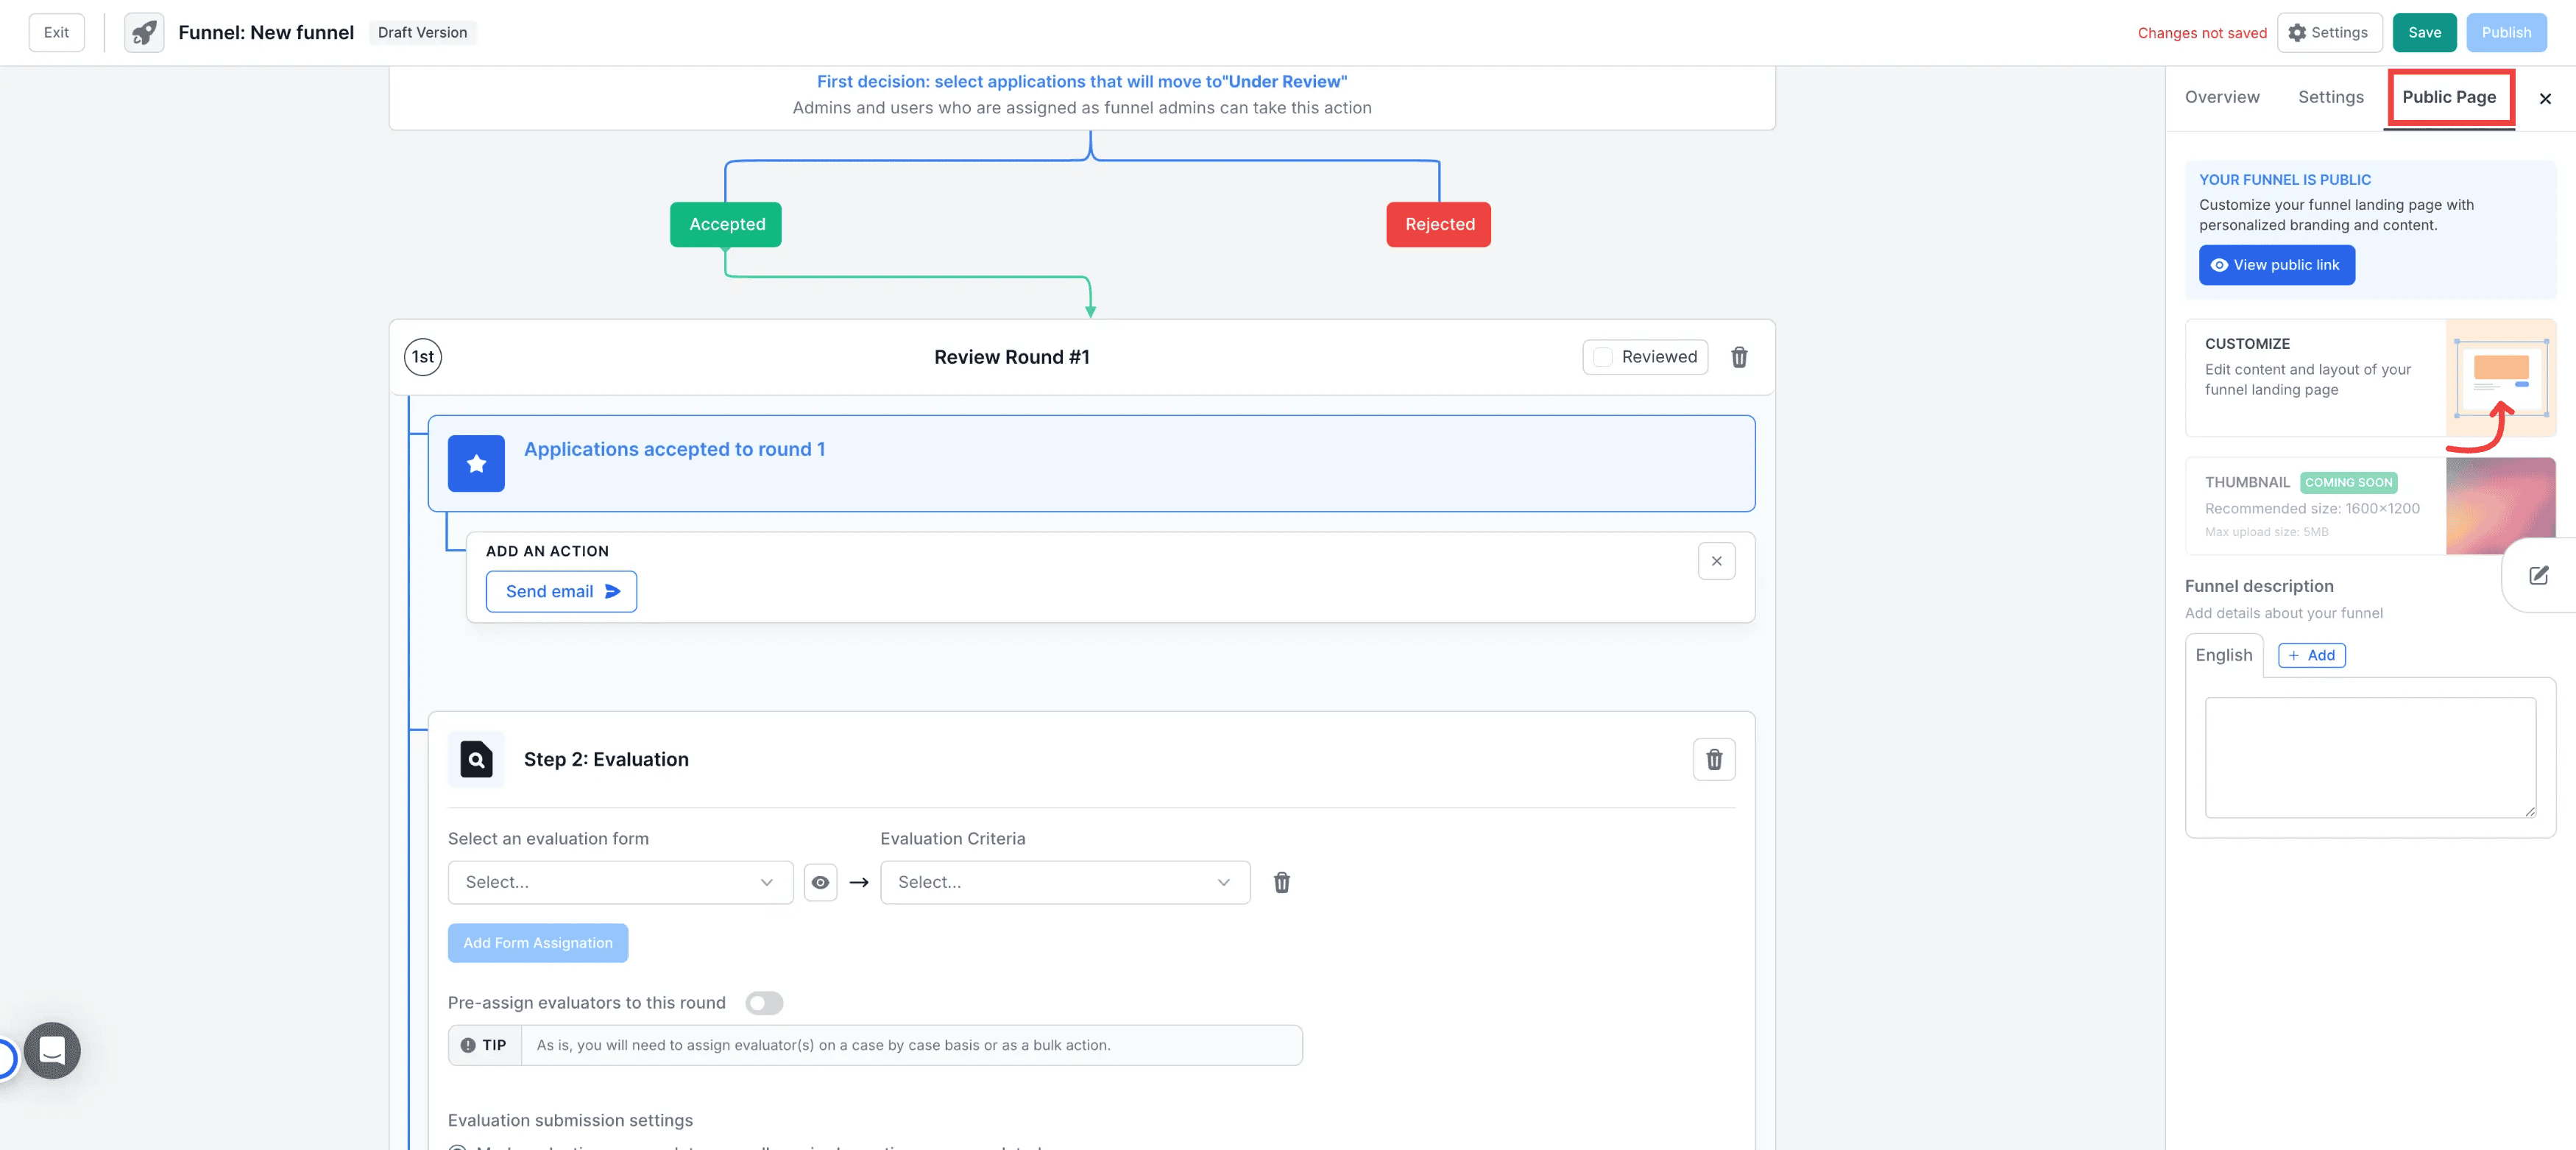
Program Linking: Link a specific program to automatically display its location, start/end dates, and hero images on the landing page.
Funnel Admins: Assign specific staff or coaches as Funnel Admins to grant them access to manage this specific pipeline.
6. Landing Page & Public View
Customize the Applicant Landing Page to control the first impression of your program. This is the public-facing side where candidates see specific instructions and program details before they begin. Click here to know more about it.
Tips & Best Practices
Instructional Emails: Always add an "Instruction Email" at the start of a new round to tell applicants exactly what to expect next.
Pre-assign Evaluators: Within the funnel settings, you can pre-assign staff to evaluation tasks to automate your workflow.
Publish to Activate: Changes made to a published funnel will not retroactively affect applications that have already been submitted.
Asset Preparation: Create your Forms, Email Templates, and Tags before building the funnel for a seamless setup experience.